Tuesday, December 16, 2008

A Touching Gift

Since I've been posting about gift ideas, here's a gift I got today from my friend Lani. It made my whole day. It was the perfect gift and so thoughtful. Isn't this the cutest idea?

Inside this cute little tin...
Photobucket

were these adorable little magnets...
Photobucket

The thing that touched me the most about this gift was that she spent the time choosing images that describe our family for the magnets and made the magnets by hand. The B for Bryan, the superman for Theron, love for our family, Sydney loves ladybugs. It was all just so thoughtful and I loved it! It was her way of saying Thank you to me and I feel like I can't say thank you enough to her.

Monday, December 15, 2008

Cookie Exchange

Photobucket


I was invited to a cookie exchange last Friday. It was so fun! I spent the whole day baking my cookies. I was told to bring a 1/2 dozen cookies for each person attending the exchange. There were 19 people attending so I had to make 19 half dozen cookies. I went with one of my favorite cookie recipes. I've posted this on my personal blog before and also my family website but you can't go wrong with these. They're so good! It's another cookie recipe that involves a cake mix, which equals an arm work out, so they're sooooo worth it in the end. You have to work for these bad boys so dig in!

Chocolate Rolo Cookies
1 devils food cake mix
1/2 c. butter softened
1 tsp vanilla
2 eggs
1 bag of Rolo candies

Mix by hand 1/2 cake mix with softened butter, vanilla and eggs. Stir until smooth. Add remaining cake mix. Stir until smooth. Wrap dough around the unwrapped Rolo, just enough to cover the Rolo. Bake at 350 for 10-12 minutes. Sprinkle with powdered sugar.

Although the recipe doesn't call for the company of an adorable 4 year old, I recommend it. It makes eating the cookies so much more fun!

Photobucket

Sunday, December 14, 2008

[Re]furbished Frames

Another idea I sampled was these frames. Super cheap. I think these might even be from the dollar store. I bought these so long ago, I can't remember where they're from, but any wood frame would work.

I basically sanded them down, painted them red, sanded the edges some more, added ribbon and a rub-on. viola!

Photobucket

Ribbon Tag Blanket

I got this idea for a blanket from my friend Jill. It took about 3 hours from start to finish. Here's how you make it: (and don't be afraid to post any questions in the comments section. I'm not so good with the step by step thing).

Choose your fabric and ribbon. You can do as much as you want with the ribbon. It will get more expensive with the more ribbon you use. I had all of this ribbon on hand so I didn't have to buy any, that's why I used 6 different kinds. You could use different ribbons or you could use the same ribbon. Either way would be cute! The thing that attracted me to the blanket was the cute ribbon and the soft textured material. I don't even know the name if it but it is sooo soft and sooo cute. I bought it at Hobby Lobby for $12.99 a yard but use a coupon and you an get it 40% off.

Photobucket

First thing you do is decide where you want to place your ribbon. I just did mine on 2 ends of the blanket. Cut your ribbon in 4 inch strips. Fold it in half and iron it so it will stay creased and it will be 2 inches. This ironing the ribbon part is what took the longest to do. Everything else went by so much faster.

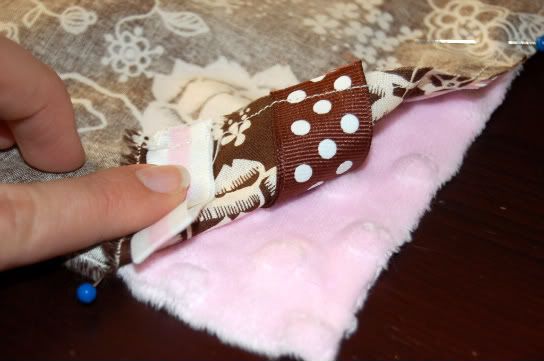
After the ribbon is ironed, pin it to the good side of one of your fabric. Make sure to pin it on with loop of your ribbon facing in towards the blanket. Pin the raw edges of the ribbon and the fabric together. Here's a couple of photos to maybe make a little more sense...
Photobucket

Photobucket


Once you have your ribbon pinned on... sew it together.
Photobucket

Like I said I did ribbon just one 2 sides of my blanket. My friend Jill did 4 sides of the blanket she made and it was adorable. Once the ribbon is sewn on you'll lay the piece of fabric with the ribbon on top of the textured fabric. Good sides facing each other, in this picture I just flipped up the corner to give you an idea of which way is correct. Good sides touching...
Photobucket


and pin it together to stay in place while sewing. Pay attention to where you start sewing because you're going to sew all the way around the blanket. All 4 sides. When you get back to the side you started on leave a good 3 inch opening and end your stitch there. You want the the opening because this is where you turn the blanket right side out. So your good sides of the fabric are on the outside. Make sure you remove the pins before you turn it though. They're hard to remove when the pins are on the inside of the blanket. I didn't take a picture of this step... I forgot because I was too excited to see the final product. Once the fabric is turned right side out stitch the 3 inch opening closed by hand. I think Jill said at this point she actually sewed all the way around the blanket but I just left mine.

I don't know how I forgot to take a picture of the final product but I the only one I have is while it's being used. Ha!
Photobucket

Photobucket

Monday, December 8, 2008

Chocolate Sandwich Cookies

These cookies are so delicious but you have to work hard to get them. O.k., so not hard but the dough is really tough to stir. Total arm work out. But man, are they worth it!

Photobucket

2 packages devils food cake mix
4 eggs, lightly beaten
2/3 c. vegteable oil
1 package (8 ounces) cream cheese softened
1/2 c. butter or margarine, softened
3 to 4 c. confectioners sugar
1/2 teaspoon vanilla extract
red and/or green food coloring, optional

In mixing bowl, beat cake mixes, eggs and oil (batter will be very stiff, this is where the arm work out comes into play. Feel the burn). Roll into 1 inch balls & place on ungreased cookie sheet and flatten slightly. Bake at 350 for 8-10 minutes or until a slight indentation remains when lightly touched. Cool. In another mixing bowl, beat cream cheese and butter. Add sugar and vanilla, mix until smooth. Divide frosting into 2 separate bowls and add red food coloring in one bowl and green in the other. Spread on bottom of half of the cookies. Top with remaining cookies.

I used Wilton food coloring to get the bright colors in the frosting.