Friday, July 3, 2009

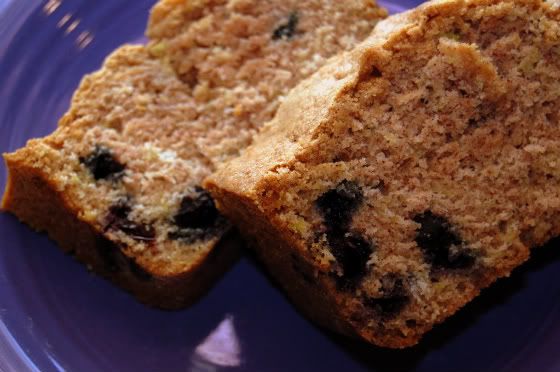
Zucchini Blueberry Bread

Are you ready for this? No really, are you ready for this.

Photobucket
I got his recipe from my friend Melanie...

Blueberry
Zucchini Bread
3 eggs
1 c. oil
2 c. sugar
2 c. zucchini (grated)
3 tsp. vanilla

Beat egg until foamy. Add oil, sugar, vanilla, and zucchini.

Then add:
3 c. flour
1 tsp. salt
1 tsp. soda
1 tsp. baking powder
3 tsp. cinnamon
dash nutmeg
Sift together and add to egg mixture.

Add:
1 c. blueberries
1/2 c. nuts (optional)

Bake in greased and floured bread pans at 325 degrees for 50 minutes to an hour until a knife inserted in the center comes out clean. Makes two loaves.

Saturday, June 27, 2009

Creme Brulee French Toast

Ben loves this recipe. His birthday is coming up next Saturday and I plan on making this for him for breakfast on his special day. I thought I'd share the recipe since it's amazing and easy.
I love that all the prep is done the night before and then refrigerated until the next morning. I'm pretty sure this recipe is pretty popular but just in case there is someone out there who hasn't tried it...you have to.

Anyways, here's the recipe...

Photobucket


Creme Brulee French Toast
INGREDIENTS
• 1 stick (1/2 cup) unsalted butter
• 1 cup packed brown sugar
• 2 tablespoons corn syrup
• An 8- to 9-inch round loaf country-style bread
• 5 large eggs
• 1 1/2 cups half-and-half
• 1 teaspoon vanilla
• 1 teaspoon Grand Marnier or Orange Juice
• 1/4 teaspoon salt

DIRECTIONS

In a small heavy saucepan melt butter with brown sugar and corn syrup over moderate heat, stirring, until smooth and pour into a 13- by 9- by 2-inch baking dish. Cut six 1-inch thick slices from center portion of bread, reserving ends for another use, and trim crusts. Arrange bread slices in one layer in baking dish, squeezing them slightly to fit.

In a bowl whisk together eggs, half-and-half, vanilla, Grand Marnier, and salt until combined well and pour evenly over bread. Chill bread mixture, covered, at least 8 hours and up to 1 day.

Preheat oven to 350° F and bring bread to room temperature.

Bake bread mixture, uncovered, in middle of oven until puffed and edges are pale golden, 35 to 40 minutes.

Serve hot French toast immediately.

(Ben likes his with a little bit of warm real maple syrup. Not the fake stuff. You know the goodness from a tree stuff).
Tuesday, June 23, 2009

4th of July Dress...

I love all you crafty bloggers out there. You have the most amazing ideas that I can use on my almost nonexistent budget. I was checking out Trey and Lucy and saw the cutest bandanna dress that gave me an idea for a 4th of July dress for Sydney. That day is Ben's birthday after all, so we try to dress for the occasion. Here's the one I made for Missy Moo, and it really did only take me about 15 minutes. Okay, maybe 23 or so but it was my first one...

I bought the bandanna's at Joanns for about $1.25 each. The ribbon, I [re]used from another project so the dress cost a whopping $2.50 to make! Woo Hoo!

Click here if you want a tutorial on how to make one

Photobucket

Tuesday, June 16, 2009

Birdseed cookies...

These were fun and easy and very kid friendly. Got the idea from
Let's Explore. Click on the link to get a little more info on the craft and what to do to make it go smoothly. So fun!

Here's the recipe:
Birdseed Cookies
  • 3/4 cup flour
  • 1/2 cup water
  • 3 Tablespoons corn syrup
  • 4 cups birdseed
Mix it all together.

Photobucket

Pat it all out flat on a cookie sheet and cut with cookie cutters.

Photobucket

Transfer to another cookie sheet and let dry. To transfer the cookie, you might need to scoop the birdseed with the cookie cutter still around it for it to hold it's shape. Once it's transferred you can remove the cookie cutter and it should hold up fine.

Photobucket

Make sure to poke holes in the top to put ribbon through. You could use a straw or a skewer for the whole.

Photobucket

Photobucket


The kids have had fun looking at the cookies throughout the day to see how much has been eaten. It's also been fun to watch all the birds come into the yard.

Monday, June 15, 2009

Tip Junkie is having a huge Dot Com Birthday Bash with lot's of fun giveaways. She has changed her site around and there's lot's too see. Go check it out! Her link is on the sidebar too.

Wednesday, February 11, 2009

Photobucket

I always struggle with ideas for gifts for Theron's teacher. He's a guy and a lot of the ideas I have seen and wanted to make are way too girly. I came across this idea on another blog and thought it would be perfect. It's not girly and Theron could help me make it.
Of course, before starting a project I have to scrummage through my craft supplies to see if there is something I can [re]use first. I found this 2 pack of frames that I had bought on clearance and got stepped on by one of the kids. Oops!

Photobucket


That's o.k. though, I knew there was a reason I couldn't part with those frames even though one was broken. I paid $1.24 for those bad boys. I was too proud to let my cheap find go to waste.

I did buy a new 24 pack of crayons. I figured I could splurge $2 for the project.

There wasn't a tutorial on the blog I got the idea from so I kind of had to figure it out as I went. Which wasn't hard but there might have been easier tools to use. The girl said she used a tool but it made such a mess with little crayon shavings every where that I just used a steak knife. It worked fine and there was minimal mess. Theron and I just guessed and played around with the sizes to form the letter J. It really wasn't hard. Just a little time consuming. I kept wanting to get anal and make the crayons the perfect size but I kept reminding myself..."this is Theron's gift".

I removed the broken glass and paper from the frame so I could see the inside of the back part of the frame. You know the piece that has the stand attached to the back. So basically it's just the frame and the backing chipboard part that has the stand. Does that make sense? The J is actually on the inside of the back piece.
maybe this photo will help
Photobucket


I attached a white piece of card stock and used that as my background of the letter. I couldn't find my low temp hot glue gun so I used the mod podge to attach the crayons to the paper as well. It's holding up great so I'm not worried.

Then I just wrote his name in it. Vinyl or stickers would have been so much better but Theron was so excited to get it done that I just wrote it quick. Theron loved helping with this and glued most of the crayons himself. I think it turned out pretty cute. The J looks a little like a stocking but Theron is sure proud!

Since we're all about [re]cycling and the cut up crayons are too little to color with, we took the left over crayon pieces and removed the paper. We lined a muffin tin with cupcake liners and threw the little crayon pieces in there. We only had enough to fill 2 papers but that's okay. Baked them at 350 degrees for about 5 minutes or until the crayons are liquid and then take them out of the oven to cool. Remove the paper liner and voila!
The perfect way to [re]use tiny crayon pieces

Photobucket


Photobucket

I'm still learning how to write great, clear, understandable, informative tutorials so please let me know if you have any questions.

Tuesday, February 3, 2009

A couple of things:

First: I actually learned the other day that I have more than 3 followers. Ha! I had no idea. My sister was hounding me telling me that she was tired of there not being a new post. Ever since then I have been trying...I promise. It has been pretty busy around here. For instance:

younger brother moved in with us
we celebrated both kids birthdays
new calling in church
getting ready to take a little weekend trip with no kids (which means house has to be grandma worthy so I'm not to embarrassed when she's here for the weekend to watch the kids.
getting audited for 2004 (our accountant was a scum bag and being audited sucks, anyone that used this guy that year is being audited so I'm sure there are a lot of people as annoyed with him as we are).
soccer practice/games
dance class
putting my blog into a blurb book and that is way more time consuming than I thought.

see! I really have been busy. I would give anything to have things slow down for a while to share some of the ideas I have come across and been brave enough to try out.
When I do get time it will be good I promise! I promise!

So, thank you to my 4 followers who even care that I share crafts Ha! You're the greatest!

Second: I changed the name of the blog to the idea I had originally had, but chickened out. I mean, I do like Martha and love her magazines but not enough to name my blog after her. My original idea was to share ideas on how to [re]do, [re]use, [re]cycle, [re]furbish anything to [re]beautify it. So, I'm sticking with that.

Welcome to [Re]beautify!